Step 1: F.lux Store and Basic Todo Functionality
Overview
This step adds state to the application using the default f.lux Store behavior. Minimal work is required to create an f.lux shadow state to have a data flow based application using immutable data structures without losing the simplicity of natural javascript idioms.
Goals
- Create a f.lux
Storewith initial state - Subscribe to store changes in
<Todos> - Implement
<AddTodo>addTodo()function - Implement
<TodoItem>to display, edit, and delete todo items - Iterate all store todo items and create a
<TodoItem>for each one
The examples/tutorial/step-1 directory contains the completed code for this step.
Technical background
F.lux stores all application state in a single object tree. A single source of truth greatly simplifies application state management, reduces complexity, and eases debugging. The f.lux store efficiently virtualizes the state tree into a shadow state as inspired by React’s virtual DOM. The virtualization process, called shadowing, binds action-type functions onto the state. Binding functions with the state makes explicit the operations that may be performed on a state property. Shadowing is recursively applied to the entire state tree. For performance reasons, the process occurs on a just-in-time basis so only the accessed properties are virtualized.
F.lux uses the Store class for representing stores. The following image shows how the store exposes the root state and the root property. Inside the root property is its shadow, which contains a reference to the actual state.

The application works with shadow objects that are accessed just like traditional javascript objects. This means your application logic looks “normal” and you can interact and inspect state objects in the javascript console like regular objects. The shadow objects are immutable so interacting with them through property assignments and function invocation result in actions being dispatched to the store for in order processing. The store then generates a change event on the next tick for the application to process the new state.
The next image shows how a list of one todo item would be shadowed:
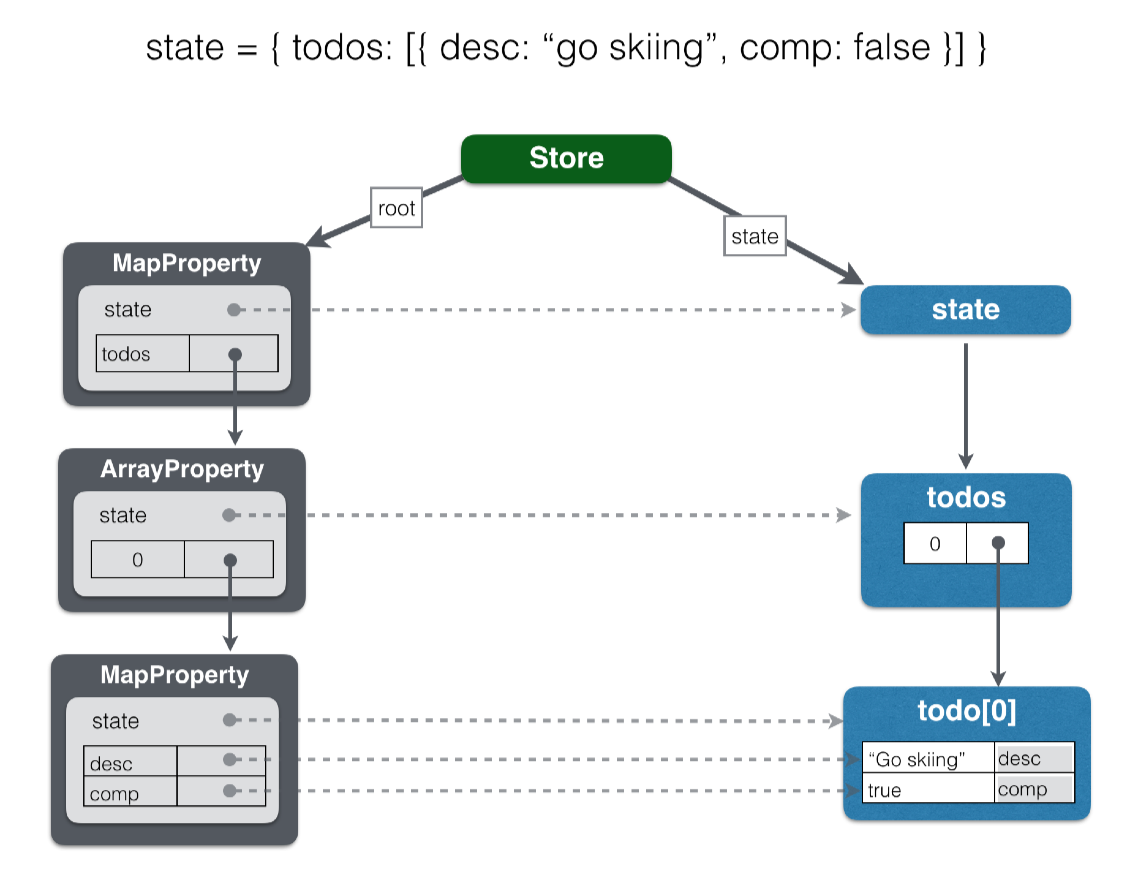
The types of properties are shown in dark gray box titles. Out of the box, f.lux will recursively ‘autoshadow’ the state to automatically map Property subclasses onto the application state. The next step will cover specifying mapping instructions. Autoshadowing performs the following javascript type to f.lux type mapping:
| Javascript type | f.lux Property subclass |
API |
|---|---|---|
| Array.isArray(type) | ArrayProperty |
Array |
| lodash.isPlainObject(type) | MapProperty |
Map |
| all others | PrimitiveProperty |
exposes the actual value |
F.lux enables normal Javascript coding syntax to access and manipulate the shadow state in a Flux compatible way. The shadow state is immutable so all mutations, whether through assignment or functions/methods will generate f.lux actions that will change the actual state and generate store change notifications to registered listeners. Some examples of code used and described in the following sections to get the concepts flowing:
Array.map()
todos.map( t => <TodoItem todo={ t } todos={ todos } /> )
- JSX
<input defaultValue={ .... } onChange={ event => ... } />
<input type="text"
    onChange={ event => todo.desc = event.target.value }
    defaultValue={ todo.desc }
/>
Array.indexOf()andArray.remove()
export default class TodoItem extends Component {
    removeTodo() {
        const { todo, todos } = this.props;
        const idx = todos.indexOf(todo);

        if (idx !== -1) {
            todos.remove(idx);
        }
    }


    render() {
        ...
    }
}
1. Create a f.lux Store with initial state
Add the following lines to main.js to create the application’s f.lux store:
import {
    Store,
    ObjectProperty
} from "f.lux";


// create the store and starting state
const root = new ObjectProperty();
const state = { todos: [] }
const store = new Store(root, state);
A f.lux based application uses a single store for managing all state. A Store instance is created by specifying a root property and the initial state. The property must be a Property subclass and the state a JSON compatible value of appropriate type for the root Property. In this case, an ObjectProperty instance is used to shadow, or proxy, a javascript literal object representing the application state. ObjectProperty is used to represent javascript literal objects and does not expose the rich Map api for adding and removing properties. ObjectProperty is useful when you have a well-defined object that does not require the functionality of a flexible, changing property list.
Drilling down into the initial state and adding an initial todo item:
{
    todos: [
        { desc: "Go skiing!", completed: false }
    ]
}
Autoshadowing will result with the following shadow property mapping:
todos:ArrayPropertytodoselements:MapPropertysince these will be objects with adescandcompletedflagcomp:PrimitivePropertywill shadow the todo item’sstringpropertycompleted:PrimitivePropertywill shadow the todo item’sbooleanproperty
The final change to main.js is to pass the store to the <Todos> component using:
ReactDOM.render(
    <Todos store={ store }/>,
    document.getElementById('react-ui')
);
2. Subscribe to store changes in <Todos>
A React component subscribes with the store to be notified when the state changes as a result of f.lux actions. The store exposes the following methods for this purpose:
subscribe(callback)- the store will invoke the callback upon state changesunsubscribe(callback)- removes the callback from futher notifications
The callback parameter has the following signature:
callback(store, shadow, prevShadow)
The top level <Todos> React component will be used to subscribe to state changes.
class Todos extends Component {
    componentWillMount() {
        const { store } = this.props;

        // bind onStateChange callback so can use it to register/unregister
        this.onStateChangeCallback = this.onStateChange.bind(this);

        // register for store change notificiations
        store.subscribe(this.onStateChangeCallback);
    }

    componentWillUnmount() {
        const { store } = this.props;

        store.unsubscribe(this.onStateChangeCallback);
    }

    onStateChange() {
        // brute force update entire UI on store change to keep demo app simple
        this.forceUpdate();
    }
The <Todos> component can now refresh the user interface each time the store’s state changes. <Todos> has an <h1> header with the number of incomplete items and is implemented with this change:
render() {
    const { todos } = this.props.store.shadow;
    const numIncomplete = todos.filter( t => !t.completed ).length;
    const remainingText = `${ numIncomplete } ${ pluralize("item", numIncomplete ) } remaining`;

    return <div className="todoContainer">
            <h1> F.lux Todos <small>{ remainingText }</small></h1>

            <AddTodo todos={ todos } />

            { this.renderTodos() }
        </div>
}
Here are the important sections broken down:
-
const { todos } = this.props.store.shadow;The shadow state is accessed using the
store.shadowproperty. Thetodosvariable is a shadow reference to the actual state array. Usetodosjust as you would a normal array and any mutations will be asynchronously applied through generated actions.Remember, the initial state has the form:
{ todos: [] }. -
const numIncomplete = todos.filter( t => !t.completed ).length;This statement uses the Array
filter(iter)method to obtain an array of incomplete items,!t.completed, and then takes the filtered array’s length. -
const remainingText =${ numIncomplete } ${ pluralize("item", numIncomplete ) } remaining;Format text to be placed in the application header for the number of items remaing. Uses the pluralize library to have the proper form of “items”.
-
<h1> F.lux Todos <small>{ remainingText }</small></h1>Render the header with the number of incomplete items.
-
<AddTodo todos={ todos } />The
<AddTodo>component will need totodosshadow array to add a new item.
3. Implement <AddTodo> addTodo() function
The <AddTodo> component is now receiving a property containing the todos shadow array. This is used to implement the addTodo() function:
class AddTodo extends Component {
    addTodo() {
        const { todos } = this.props;
        const desc = this.todoInput.value;

        // Create a new Todo item
        const todo = {
            completed: false,
            desc,
            created: moment().toISOString()
        }

        // add the Todo item to the array
        todos.push(todo);

        // clear the input
        todoInput.value = "";
    }
Step 2 in this tutorial will move this logic to a property but for now the logic is inlined in the component for ease or readability and allow the focus to remain on interacting with the shadow state.
Here are the key points explained:
-
const { todos } = this.props;Get the shadow array from the property set by
<Todos>component. Remember, this is a shadow array that proxies the actual state array. -
const desc = this.todoInput.value;This gets the value from the
<input ref={ ref => this.todoInput = ref } />containing the descirption for the new todo item. -
const todo = { completed: false, desc, created: moment().toISOString() }Creates the todo item state to be appended to the
todosarray. This will be encapsulated into a property function in Step 2. Notice a Todo item has three properties:completed- boolean to indicate if item is donedesc- the descriptioncreated- ISO 8601 formatted string for time item created
-
todos.push(todo);Just like a normal array, the new Todo item is appended to the shadow array. This will result in a store change notification to the
<Todos>component that will trigger arender()call.
4. Implement <TodoItem> to display, edit, and delete todo items
A <TodoItem> displays three components on a single line:
- Checked/unchecked icon: shows the completed state and a click will toggle the
completedvalue. - Input: displays and allows editing the item’s description (
desc). - Remove icon: clicking icon will delete the item.
Here is the full source for the component:
class TodoItem extends Component {
    removeTodo() {
        const { todo, todos } = this.props;
        const idx = todos.indexOf(todo);

        if (idx !== -1) {
            todos.remove(idx);
        }
    }

    handleToggleCompleted() {
        const { todo } = this.props;

        // toggle the completed flag
        todo.completed = !todo.completed;
    }

    render() {
        const { todo } = this.props;
        const { completed, desc } = todo;
        const descClasses = classnames("todoItem-desc", {
                "todoItem-descCompleted": completed
            });
        const completedClasses = classnames("todoItem-completed fa", {
                "fa-check-square-o todoItem-completedChecked": completed,
                "fa-square-o": !completed,
            });

        return <div className="todoItem">
                <i className={ completedClasses } onClick={ () => this.handleToggleCompleted() } />

                <input
                    type="text"
                    className={ descClasses }
                    onChange={ event => todo.desc = event.target.value }
                    defaultValue={ desc }
                />

                <i className="todoItem-delete fa fa-times" onClick={ () => this.removeTodo() }/>
            </div>
    }
}
Let’s start the discussion with the render() function:
-
const { completed, desc } = todoGets the ‘completed’ and ‘desc’ properties from the ‘todo’ property. The next part of this step will show how this is set by doing a
todos.map( t => <Todo todo={ t } />)on thetodosarray. -
<i className={ completedClasses } onClick={ () => this.handleToggleCompleted() } />Icon displays a checked box if the item is completed and an unchecked box otherwise. Clicking on the icon will call the components
handleToggleCompleted()function (described below). -
<input defaultValue={ desc } onChange={ event => todo.desc = event.target.value }/>Displays and allows the
descproperty to be edited. Notice this is not a bound<input>which is done to keep things simple. Step 5: f.lux-react will show an easy way to make this a bound component.The default value is the
descvalue.Each value change will cause the
onChangeevent handler to be invoked. Now this is interesting:todo.desc = event.target.valueThis statement assigns the
<input>value (event.target.value) to thetodo.descproperty. Sincetodoanddescare proxies for the actual state, this statement will generate an update action to set thedescstate value. And your code looks like regular javascript. -
<i className="todoItem-delete fa fa-times" onClick={ () => this.removeTodo() }/>This icon provides the ability to delete an item. Clicking on the icon will call the component’s
removeTodo()function (described below).
Now let’s examine the simple handleToggleCompleted() function:
-
const { todo } = this.propsStart by getting the todo item being edited.
-
todo.completed = !todo.completedNormal javascript code for toggling a boolean value. The difference is the f.lux library will generate an action to set the items ‘completed’ flag in the store’s actual state followed by an update notification to the
<Todos>component.
And finally, the removeTodo() function:
-
const { todo, todos } = this.propsThe function will need to find the index of the
todoitem in thetodosarray to remove it. -
const idx = todos.indexOf(todo)Uses the array
indexOf(value)function to get the item’s index. Again, this standard array function is being called on a shadow property. A value of -1 is returned if the value is not found. -
todos.remove(idx)The item is removed from the shadow array. This will generate an update action that will remove the corresponding todo item from the actual
todosarray in the store’s state.
5. Iterate all store todo items and create a <TodoItem> for each one
And finally, let’s update <Todos> component to render a <Todo> component for each item in the todos array:
renderTodos() {
    const { todos } = this.props.store._;

    if (todos.length) {
        return todos
            .sortBy('completed')
            .map( t => <TodoItem key={ t.$().pid() } todo={ t } todos={ todos } /> );
    } else {
        return <p className="noItems">What do you want to do today?</p>
    }
}
This function is called in <Todos> render function.
-
const { todos } = this.props.store._store._is an alias forstore.shadow. The variable name comes from the idea of a shadow on the ground,_, for an actual object. -
if (todos.length) {Yet another array-like access on an array shadow property. If function or property exists on a normal javascript array then it exists on the shadow.
-
todos.sortBy('completed')Oh, and there are a few extras. Array shadows have the regular
sort(compareFunction)function if that is your style. They have also been enhanced with the lodash inspiredsortBy()function. -
todos.map( t => <TodoItem key={ t.$().pid() } todo={ t } todos={ todos } /> )Uses the array
map()function to generate a<Todo>component for each value in thetodosshadow array. This all pretty normal stuff by now except thekeyproperty:key={ t.$().pid() }Each shadow property receives a
$()function to get the f.lux accessor. The accessor provides context information for a property. In this case,pid()gets the unique property ID identifying this property, a monotomically increasing number.Some other interesting accessor functions:
dotPath()- gets the path to the property. For example, a todo item’s path might betodos.0. Handy for debugging and form validation error highlighting.isReadonly()- f.lux provides the ability to specify values should be readonly (assignment will have no affect)nextState()- the properties state following any pending actionsstore()- the store containing the property