Step 5: Time Travel Debugger
Overview
This step will will explore using the f.lux time travel debugger and experiment with the shadow state from javascript console.
Goals
The examples/tutorial/step-5 directory contains the completed code for this step.
1. Setting up the f.lux Logger
The Store class has a low-level api for tracking state change actions. F.lux ships with the Logger class that uses this low-level listener api for logging state changes and supporting time travel debugging.
We make a small change to main.js to enable the Logger:
import {
    Store,
    Logger as FluxLogger
} from "f.lux";


const root = new TodoRootProperty();
const store = new Store(root);

// add logger as a listener - avaible in console as 'flog'. Example usage: 'flog.print'
const logger = new FluxLogger(store);
store.addListener(logger);
Running the application in the browser will cause the following to be printed to the console:
f.lux logger commands:
    back          - moves backward in time by one store state frame
    clear         - removes all logs
    forward       - moves forward in time by one store state frame
    help          - f.lux logger commands
    index         - active index of store state frames
    maxFrames     - # of store updates to cache (default=50)
    next          - alias for 'forward'
    print         - print logs to console
    printNoState  - print logs to console without state objects
    size          - # of store state frames available
    store         - gets the f.lux store

Functions:
    clearTrap(name)                    - clears a trap set by 'setTrap()'
    goto(idx)                          - move to a specific store state frame
    setMaxFrames(maxFrames)            - set the maximum number of store states to maintain (default=50)
    setTrap(cond, value, name=uuid)    - sets a debugger trap and returns name. condition argument may be
                                         a function taking next state or a string path to get a value
    tail(count=10, printState=true)    - prints last 'count' store updates


f.lux log available at window.flog
We will explore many of these commands for the remainder of this step.
2. Logging
Let’s explore the logging commands. Open your browser’s javascript console and type the following commands at the prompt.
-
flog.printPrints all state changes stored in the log. Running this command immediately after the application launches look the following once the
Objectis expanded: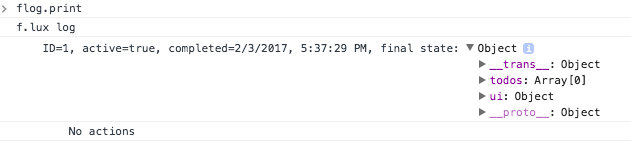
This describes the starting f.lux store state.
ID- a log frame identifieractive=true- used for time travel debugging. Thetruemeans this frame represents the current f.lux store state.completed=...- the timestamp for when the state change occurred. The first frame will show the timestamp and subsequent onces will print the time since the previous framefinal state- the actual f.lux store state (not shadow state)
-
Create a todo item and make a one character change. I created an item with “ski” as the description and added a ‘!’ to the end.
Type
flog.printand you should see output similar to this: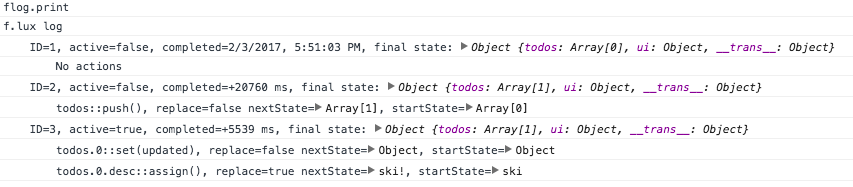
Now there are 3 frame:
ID=1- the initial frameID=2-todos::push()was the action and you can inspect the starting and ending property state fortodos.ID=3- the actions are shown ordered by the dotted path, ie ‘todos.0’ and ‘todos.0.desc’. The two actions are to set thedescproperty and theupdatedtimestamp property.
-
flog.maxFramesCommand will print the number of log frames to maintain. The default is 50.
-
flog.sizeCommand prints the number of log frames available.
-
Create some todo items and make some edits to increase the number of log frames.
-
flog.tail(5)The
tail(count=10)will print the end of the log. This command is a function unlike the previous property type commands. The default is to print 10 frames.flog.printalways prints the entire log. -
flog.store._.todos.lengthThe
flog.storecommands gets the f.lux store and_is the root shadow state. So this command gets the length of thetodosshadow property.You could also use
flog.store.shadowif you prefer more typing. Btw, the choice of the ‘_’ for accessing the shadow state was chosen because it “looks” like a shadow on the ground, right? -
flog.clearClears all log frames. Can be handy when you want to track some activity since all log data will relate to the activity of interest.
3. Time travel
Time travel debugging is the ability to move back and forth between f.lux store state. Time travel debugging along with hot reloading can form a productive UI development environment. This section will simply explore the time travel commands and not perform any actual debugging tasks.
Make sure you have some todo items and have made a few edits so you flog.size shows between 5 - 10. This will give us enough for time travelling but still be manageable.
-
flog.printNoStateThis prints all the log frames, like
flog.print, without the state objects. This makes for a smaller output. Here is my console screenshot: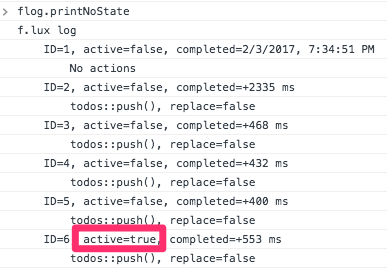
Notice the last frame has
active=trueindicating it is the f.lux store’s current state. -
flog.goto(0)This will reset the f.lux store to the state of the first log frame. You should see the UI revert to this state.
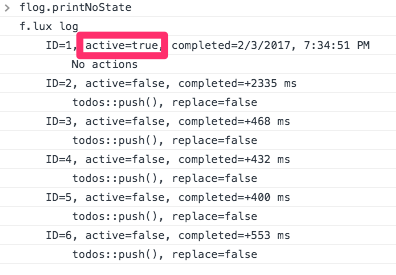
And now the first log frame show
active=true. -
flog.nextMoves the next log frame and you should see the ui update.
-
flog.backMoves to the previous log frame.
-
flog.indexPrints the current log frame index, ie
active=true. -
flog.goto(flog.size - 1)Goes to the last log frame.
4. Fun with shadow properties
Working with the f.lux store shadow state can be a handy way to debug problems or just get a better understanding of f.lux.
-
Refresh the browser so you have no todo items.
-
flog.store._.todos.addTodo("Hello")You should see a todo item in the UI with the description “Hello”. We accessed the
todosshadow array,TodosListPropertytype, and invoked theaddTodo()method we defined in Step 2: Properties. -
flog.store._.todos[0].completed = trueAnd we just marked our new todo item as completed. You should the item marked in the application.
-
flog.store._.todosPrints out:
CustomShadow {__state__: Array[2], Symbol(impl): IndexedShadowImpl, Symbol(_cache): Object}Yep, not a real array. But what is the property type that backs the shadow?
-
flog.store._.todos.$$()Remember the
$$()shadow method returns thePropertyinstance. In this case, the console will print:CustomProperty {_indexed: IndexedApi, Symbol(pid): 3, ...} -
flog.store._.todos.$$().typeName()We are invoking the
Property.typeName()method to get thetypeNamevalue set on theTodoListProperty.typedescriptor.export default IndexedProperty.createClass(TodoListShadow, type => { type.elementType(TodoProperty.type) // each model contained will be a TodoProperty type .typeName("TodoListProperty") // useful for diagnostics });And sure enough, the console outputs
TodoListProperty. -
flog.store._.todos.$$().stateType()This gets the actual
StateTypeinstance used to shadow thetodosstate. -
flog.store._.todos = []The console will output
[]but the ui will not change. And running the commandflog.store._.todos.toJSON() > [Object]shows there is still a single object in the array.
-
flog.store._.todos.map( t =>${t.desc}, ${t.updated})We are using the
Array.map()method to print out information about all the todo items.
Final Thoughts
This tutorial step covered setting up the f.lux Logger and using it to track state changs and time travel. We also messed around on the javascript console to manipulate the shadow state manually.